
I assume that readers know the basics of Spring-boot and REST. Here we will try to learn how to implement Microservice using Spring boot, Eureka Naming Server and Feign.
Theory in short:
NOTE: you may skip this section and start directly from the “Implementation” section.
Microservice (Architecture) is a method to divide an application into multiple small independent services where each service is focused on well defined specific function. And to achieve the overall functionalities of the application the services can communicate with each other. It is very important that each service is composed of very well defined interface and operations.
So How can we implement microservice?
From the above short discussion we can conclude that 2 things are very important:
- Create (divide) well-defined services and
- Communication among these services
RestTemplete can be used to call REST-API for communication among services. But in this way, we need to hard code the address of other services which is not convenient to implement client-side load balancing when a service can have multiple instances to distribute the load.
To distribute client-side load balance Ribbon can be used. ‘Ribbon’ is a client-side load balancer that gives a lot of control over the behavior of HTTP and TCP clients. As Feign provide a better alternative to RestTemplate to call REST API and as Feign already uses Ribbon, we can use it directly (@FeignClient).
But still, with Ribbon we need to hardcoding the URL for all instance of a service to achieve load balancing. That means when new instances of a service are launched up we have no way to distribute load between them (without giving the address of new instance manually).
So, we need a naming service where all the service instances can register them and other services can find them as a list by specific name. When a new service instance registered them with the naming service, naming service will have the list of all the information about service(instances of services) which will send to Ribbon and Ribbon will manage the load balancing from the client side according to that information. So we don’t need to hard code all the URL of the instances of a Service. ‘Ribbon’ will get the updated list and can manage load balance accordingly.
To keep this in mind we are going to implement our microservice homework using Eureka naming service and Ribbon.
Implementation:
You can download the example source code from here.
The step we will follow to complete the Task:
(1) Create 2 simple Spring boot application (Rest API).
(2) Run and test the 2 created application (as a monolithic application) independently.
(3) Configure and run an instance of Eureka.
(4) Configure the normal Rest APIs created in Step 1, so that they can register themselves with the Eureka Naming Server.
(5) find and calling (other) service registered in the same Naming server.
(STEP 1) Create 2 simple Spring boot application.
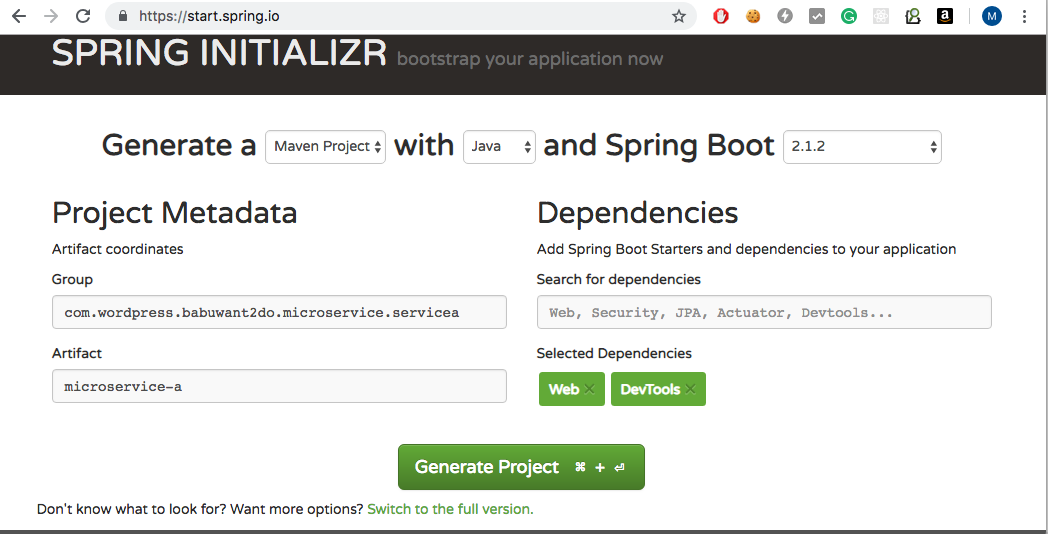
- Go to https://start.spring.io/
- Put “com.wordpress.babuwant2do.microservice.servicea” in “Group” field. (you can choose any other value as you want).
- Put “microservice-a” in “Artifact” field. (you can choose any other value as you want).
- Most importantly choose the dependencies, for sure you need to choose “web” and optionally I have chosen “DevTools” to make my life easier. But you can ignore “DevTools” as a dependency.
- Now click on “Generate Project”. It will automatically create a Spring-boot and download it to your default download directory.
- Repeat step 1-5 to create another Spring boot application with different “Group” and “Artifact” value. For Example:
"Group": "com.wordpress.babuwant2do.microservice.serviceb"
"Artifact" : "microservice-b"
"dependencies": "web" , "DevTools"
(STEP 2) Run and test the 2 created application (as a monolithic application) independently.
- Now we need to extract the compressed file and can optionally import the project from Eclipse or any other IDE.
- To run and test an application, we have to create a Rest controller. So, we created following Simple rest controller (in a new package: com.wordpress.babuwant2do.microservice.servicea.microservicea.web.rest):
package com.wordpress.babuwant2do.microservice.servicea.microservicea.web.rest;

import org.springframework.http.ResponseEntity;
import org.springframework.web.bind.annotation.PathVariable;
import org.springframework.web.bind.annotation.RequestMapping;
import org.springframework.web.bind.annotation.RestController;

@RestController
@RequestMapping("/api/resource-a")
public class ServiceAResource {
     @RequestMapping("/hello/{name}")
     public ResponseEntity hello(@PathVariable String name){
          return ResponseEntity.ok("Hello "+ name);
     }
}
2. Run the application from a command prompt using the following command (or by importing the project in eclipse, you will find lots of instruction if you google it ):
./mvnw spring-boot:run
3. Test the service from Postman (https://www.getpostman.com/). open postman (if not installed in your system, install it first).
- Call get method using following URL: “localhost:8080/api/resource-a/hello/Ali”. you can replace the last part of the URL “Ali’ with whatever you want. we use port 8080 because default port for spring boot is 8080. we will change this port in the future.

- After calling this service you will receive a message like: “Hello Ali”. And if you don’t receive any message, something is wrong.
- Anyway, I hope all is good up to this point.
4. To test the “microservice-b” application follow 1 -3 of STEP-2. but before run the application make sure you have stopped the previous on “microservice-a”, otherwise the application run failed because of port conflict (both apps cannot run on same port 8080). and to avoid confusion we created service with a different name as below:
package com.wordpress.babuwant2do.microservice.serviceb.microservicea.web.rest;

import org.springframework.http.ResponseEntity;
import org.springframework.web.bind.annotation.PathVariable;
import org.springframework.web.bind.annotation.RequestMapping;
import org.springframework.web.bind.annotation.RestController;

@RestController
@RequestMapping("/api/resource-b")
public class ServiceBResource {
     @RequestMapping("/welcome/{name}")
     public ResponseEntity welcome(@PathVariable String name){
          return ResponseEntity.ok("we would like to invite you ("+ name +") from resource B.");
     }
}
5. After running the application if you call get method with URL: “localhost:8080/api/resource-b/welcome/Ali” you must see an output like: “we would like to invite you (Ali) from resource B.”
Up to now, we have created 2 simple monolithic spring-boot application and tested with Postman. Everything works as expected. In the next step, we will try to set up a Naming server where other services (microservices) can register themselves and also can find and call other services.
(STEP 3) Configure and run an instance of Eureka.
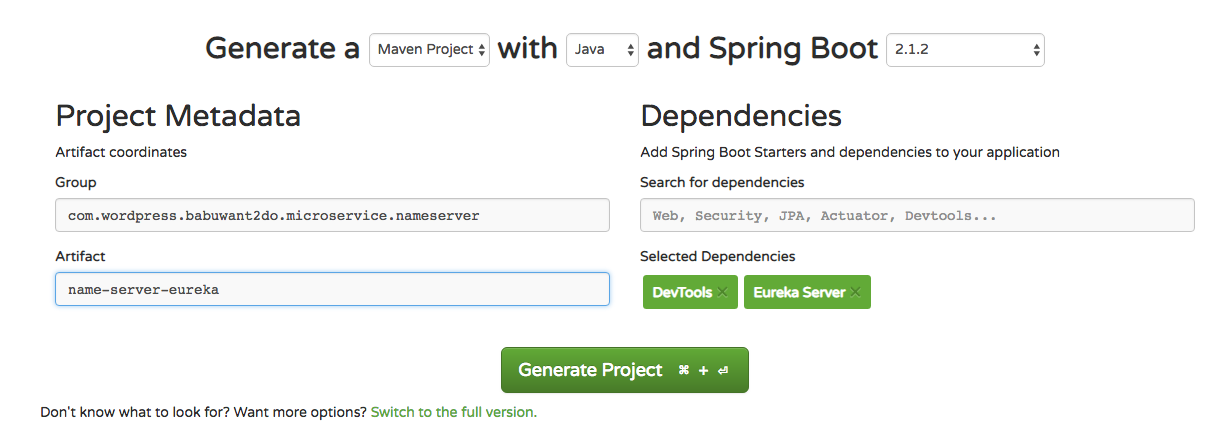
- To setup Eureka Naming Server we have to follow STEP-1 with different dependency and maybe with different Group and artifact name:
"Group": "com.wordpress.babuwant2do.microservice.nameserver"
"Artifact" : "name-server-eureka"
"dependencies": "Eureka Server" , "DevTools"
2. Extract the zipped file and import the project in your favorite IDE. before we run this project we need to work on this project as follows:
- Open the following file: “/src/main/java/com/wordpress/babuwant2do/microservice/nameserver/nameservereureka/NameServerEurekaApplication.java”, and add “@EnableEurekaServer‘ on the class as below which is enough to make the application as Eureka Naming Server:
package com.wordpress.babuwant2do.microservice.nameserver.nameservereureka;

import org.springframework.boot.SpringApplication;
import org.springframework.boot.autoconfigure.SpringBootApplication;
import org.springframework.cloud.netflix.eureka.server.EnableEurekaServer;

@SpringBootApplication
@EnableEurekaServer
public class NameServerEurekaApplication {
     public static void main(String[] args) {
          SpringApplication.run(NameServerEurekaApplication.class, args);
     }
}
- Now we need to configure the Server by inserting properties in the following file “/src/main/resources/application.properties” as below:
# name the server
spring.application.name=naming-server-babuwant2do

# we need to change the port because we cannot run multiple
# application on the same port. S we choose random port number but make sure that the port is not busy with other app.
server.port=8181

# We dont want that this app(naming server) don't register itself.
eureka.client.register-with-eureka=false

# We dont want that this app(naming server) try to fetch the registered service information.
eureka.client.fetch-registry=false
- That’s it! now we can run the application as a simple spring boot application which will work as a naming server where other services (configured) can register themselves and can request for registered service information.
- Run the app as a simple spring boot app with the command:
./mvnw spring-boot:run
- go to your favorite web browser and go to http://localhost:8181/, you will see a home page with basic information of Eureka name server where so far no application/service is registered.
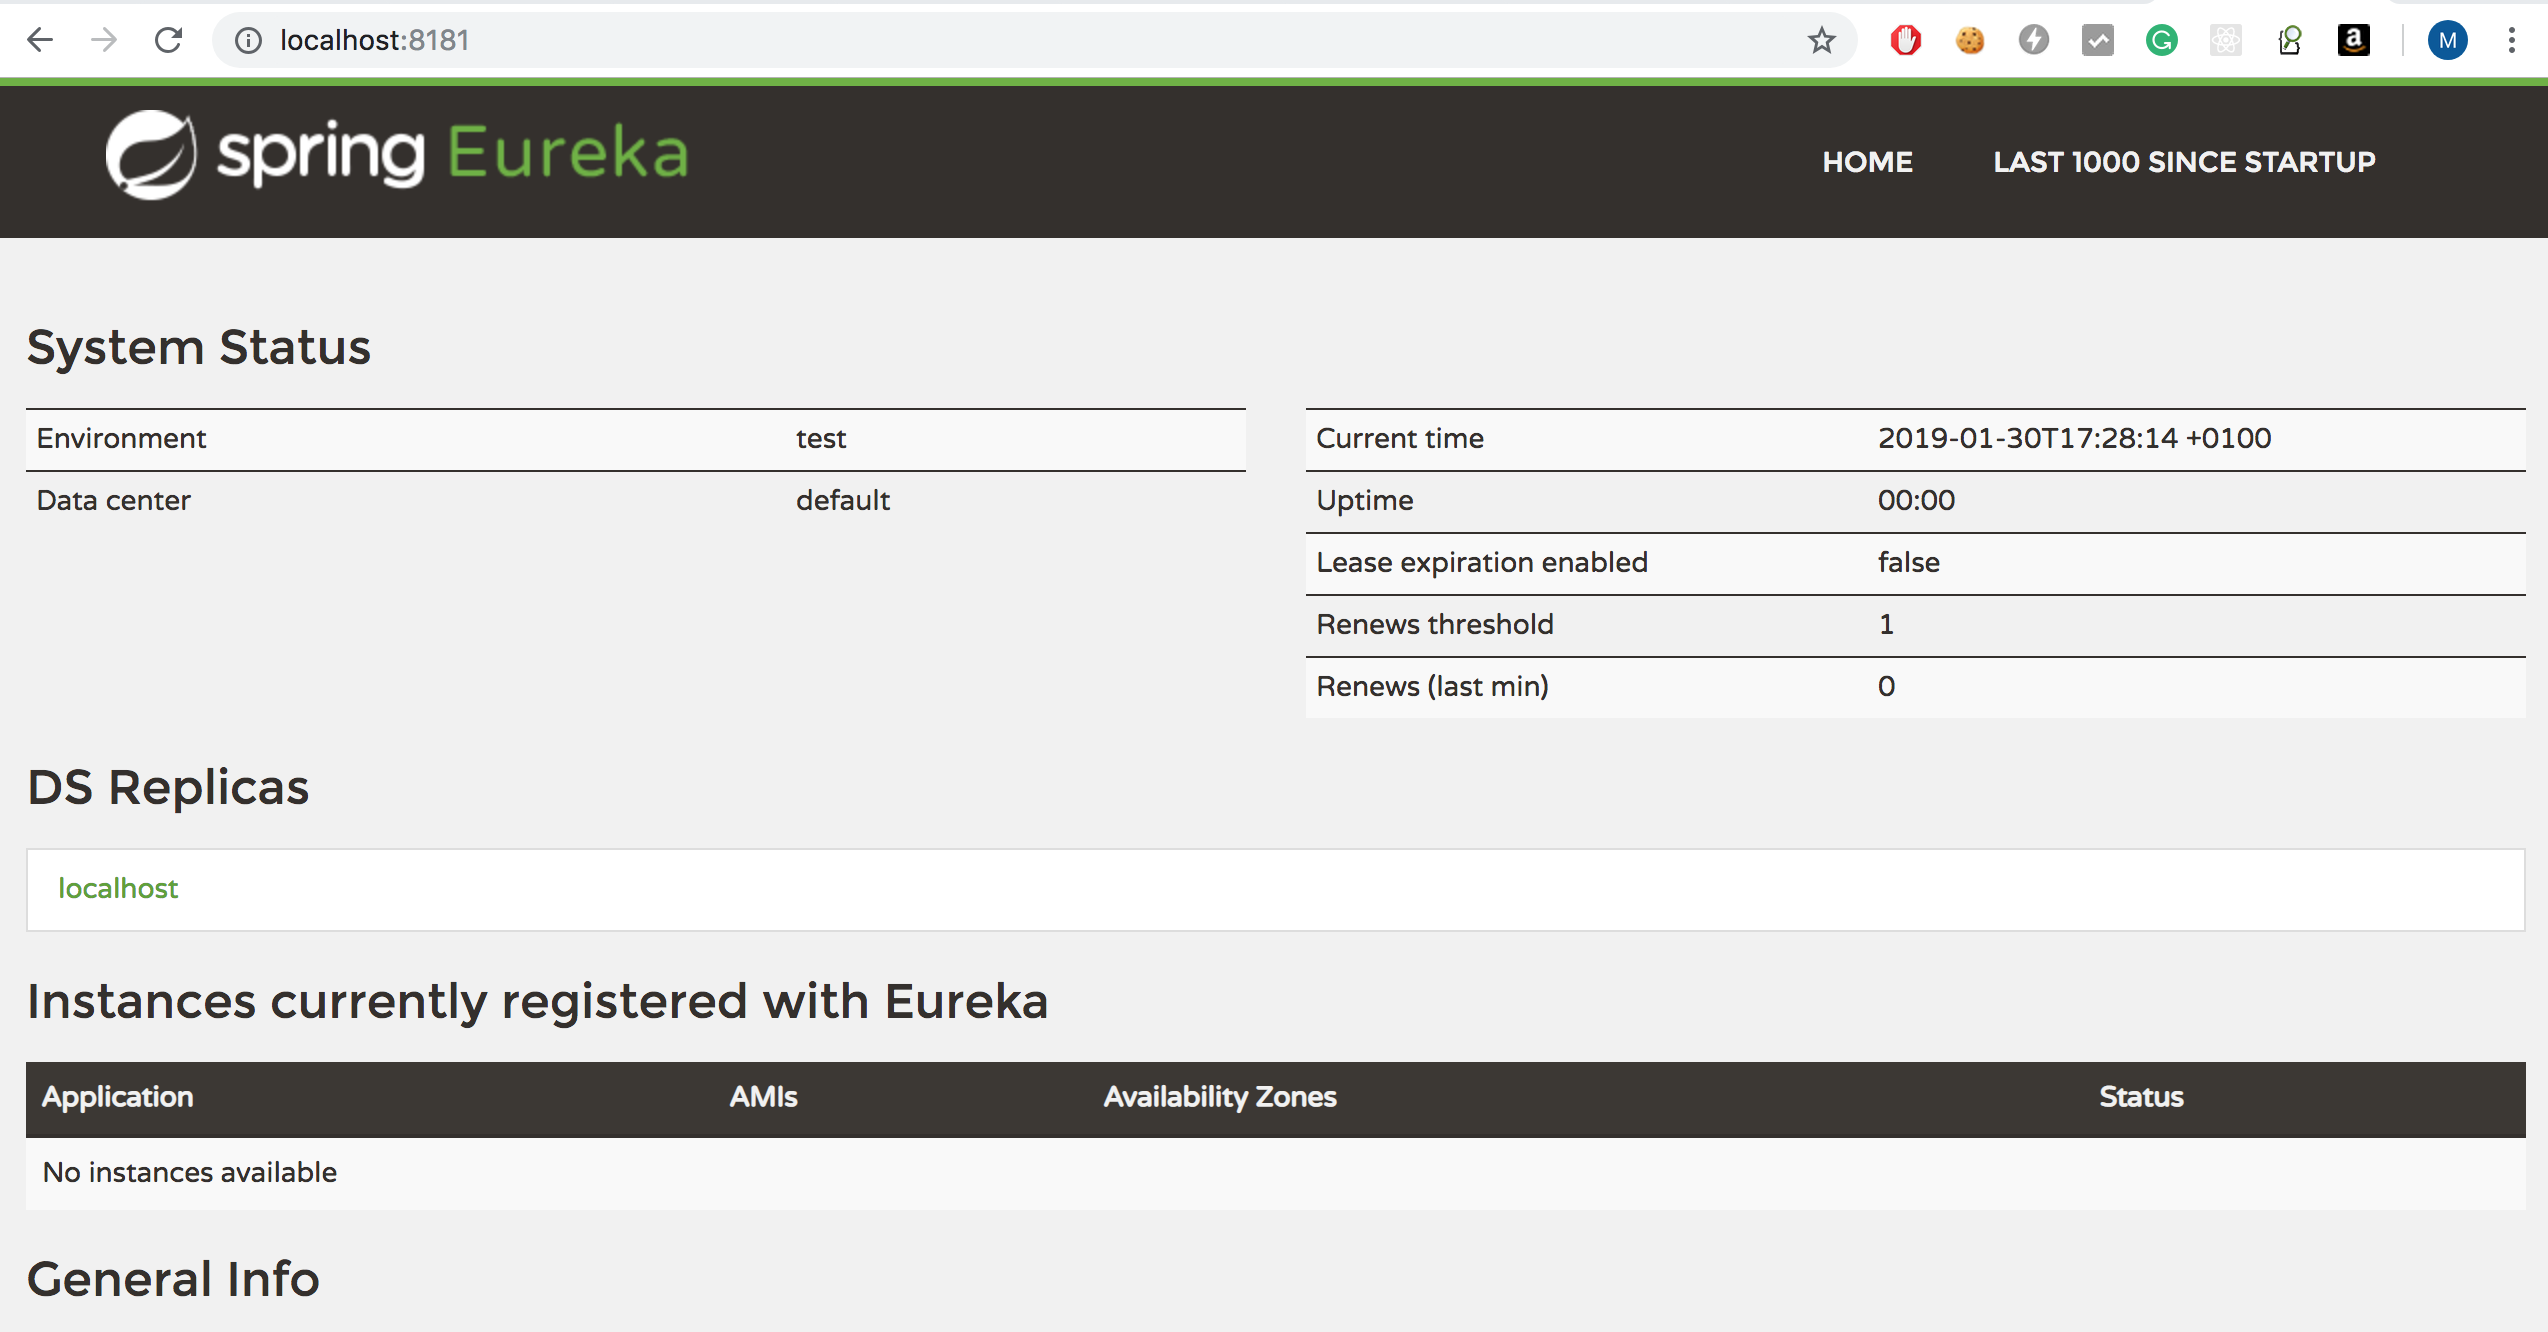
- At this point, our Naming Server is ready to receive the Registration request from services.
(STEP 4) Configure the normal Rest APIs created in STEP-1 and STEP-2, so that they can register themselves in the Eureka Naming Server.
- To make a monolithic application like “microservice-a” to a microservice application it needs to have the capability to communicate with the name server. and to have this capability the application has a dependency which needs to add in the pom.xml file. you can manually modify the pom.xml file as below or you can create another project in spring initializer with “Eureka Discovery” dependency and just copy and past the missing part in your pom.xml file
<properties>
    <java.version>1.8</java.version>
    <spring-cloud.version>Greenwich.RC2</spring-cloud.version>
</properties>

<dependency>
    <groupId>org.springframework.cloud</groupId>
    <artifactId>spring-cloud-starter-netflix-eureka-client</artifactId>
<dependency>

<dependencyManagement>
    <dependencies>
        <dependency>
            <groupId>org.springframework.cloud</groupId>
            <artifactId>spring-cloud-dependencies</artifactId>
            <version>${spring-cloud.version}</version>
            <type>pom</type>
        </dependency>
    </dependencies>
</dependencyManagement>

<repositories>
    <repository>
        <id>spring-milestones</id>
        <name>Spring Milestones</name>
        <url>https://repo.spring.io/milestone</url>
    </repository>
</repositories>
2. Add “@EnableDiscoveryClient” at the top of the main Spring boot application class in our case “MicroserviceAApplication” to enable Eureka Discovery Client.
3. Modify the property file as follows:
# use this name to register in the naming server
spring.application.name=micro-service-A
# change the port to avoid port conflict with other spring boot app.
server.port=8081

# To find the Naming server (server runs on port: 8181 in localhost)
eureka.client.service-url.defaultZone=http://localhost:8181/eureka
4. Run the application by executing the following command or run it from your IDE as a spring-boot application.
./mvnw spring-boot:run
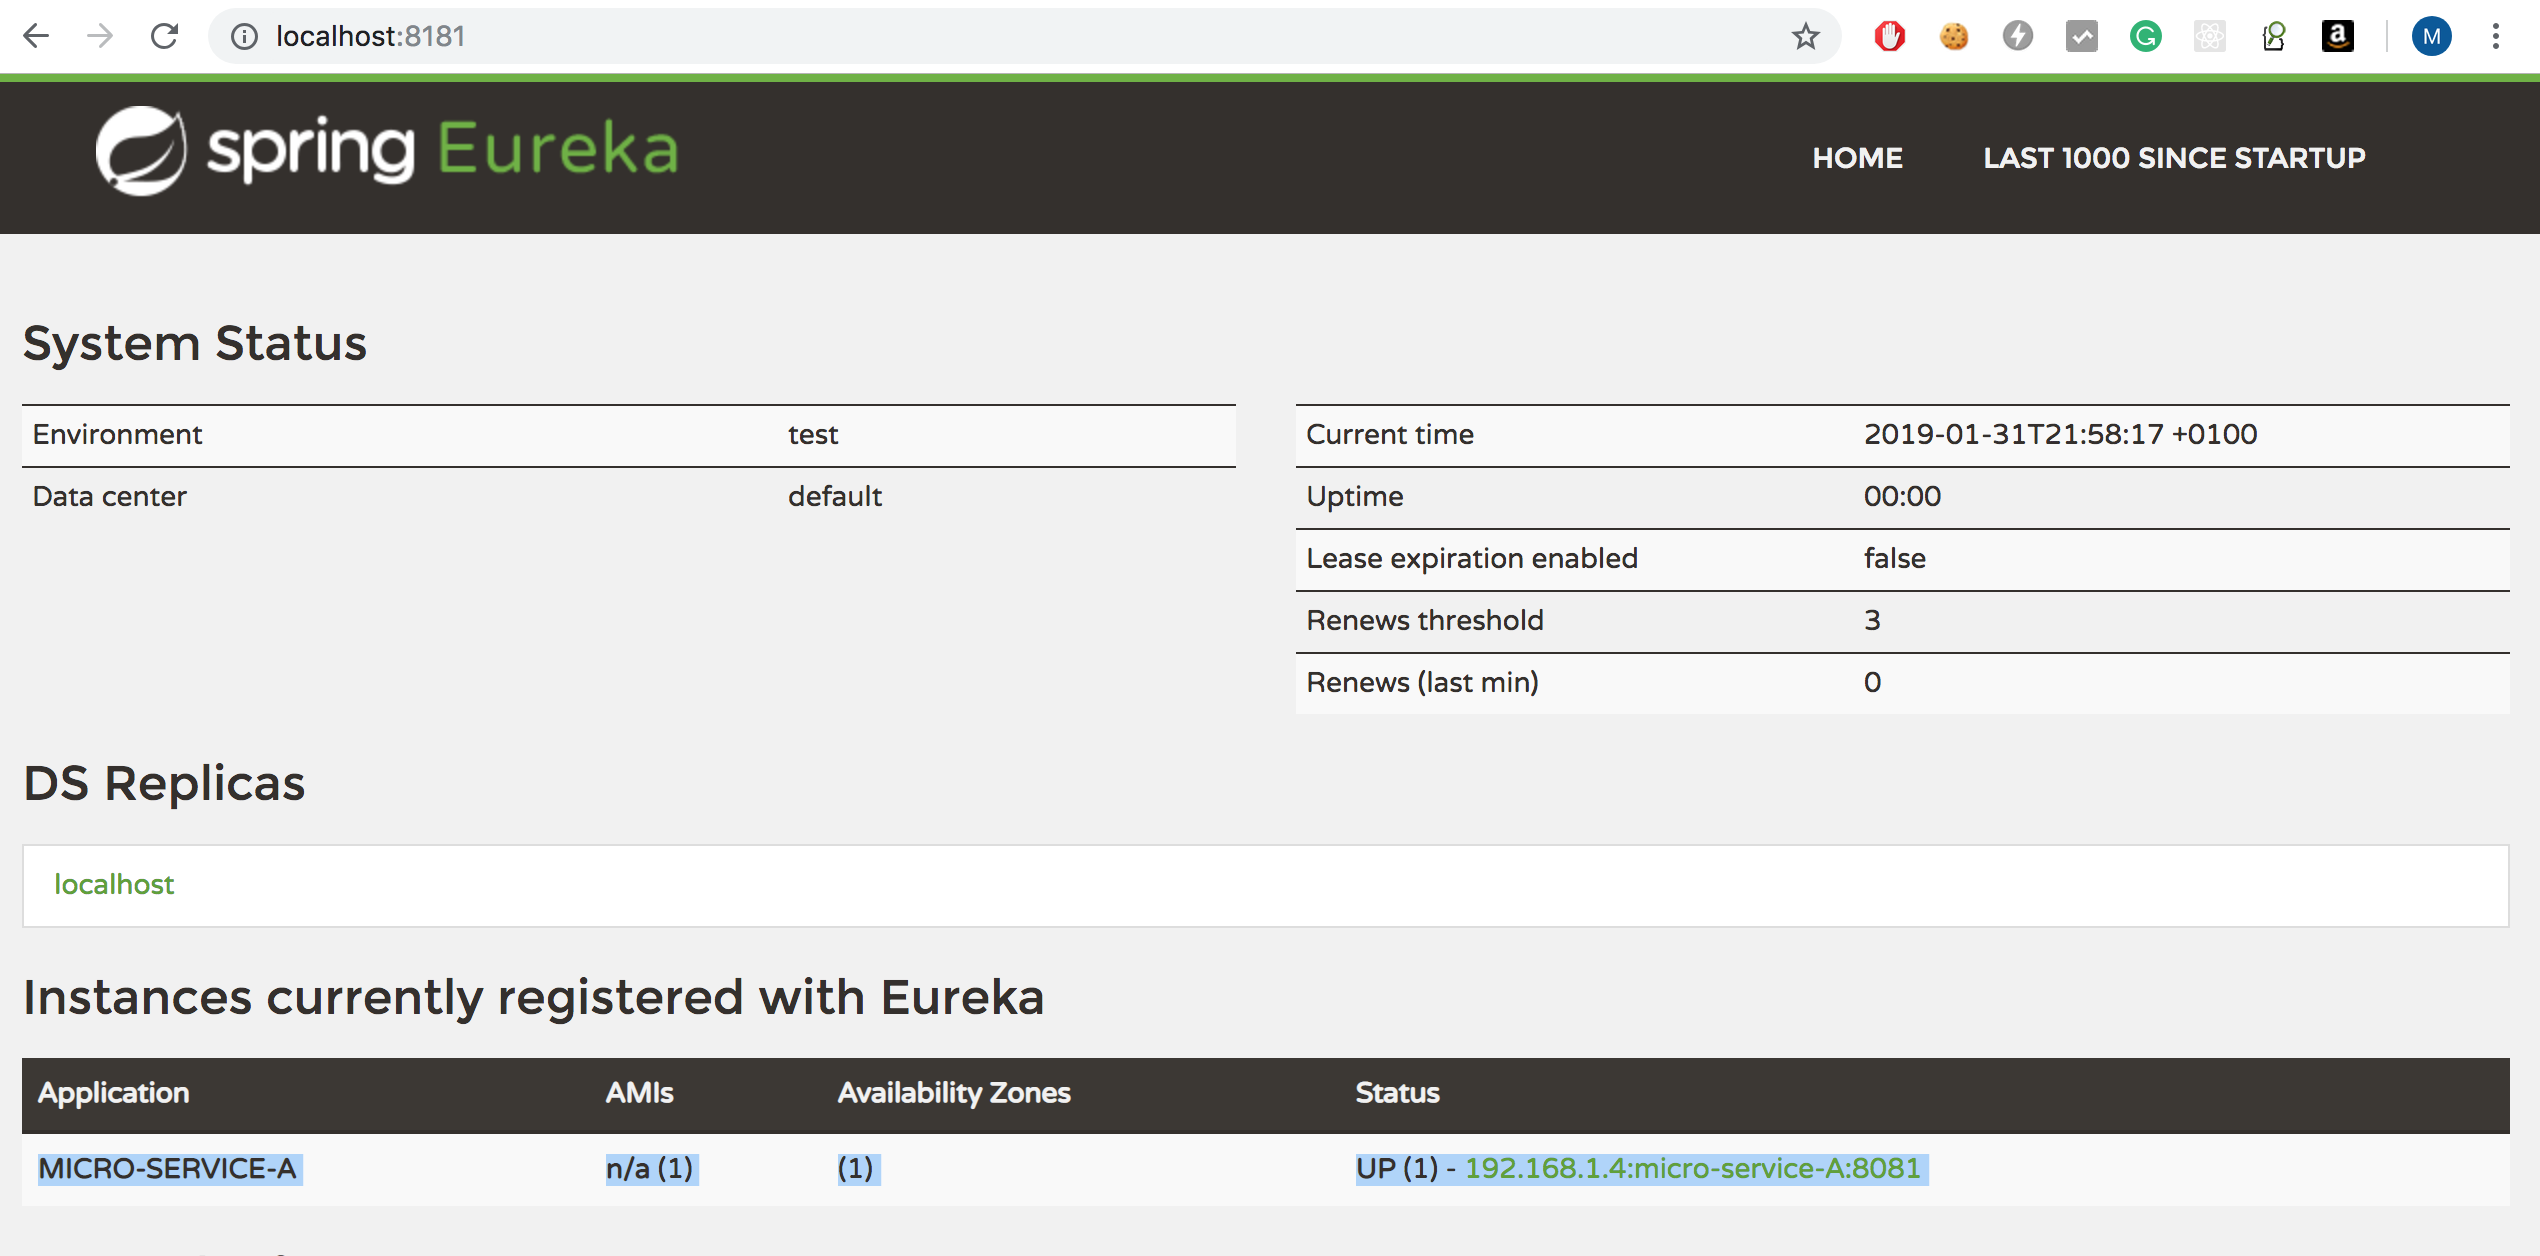
After around 30 sec later you if you see the Naming server (http://localhost:8181/eureka) you will notice that “MICRO-SERVICE-A” is registered.
Repeat the same steps (1-5) of STEP 4 for the “microservice-b” with a different application name and port number (different port number in case you want to run all the application from the same host to avoid port conflict). as an example:
# use this name to register in the naming server
spring.application.name=micro-service-B
# change the port to avoid port conflict with other spring boot app.
server.port=8082

# To find the Naming server (server runs on port: 8181 in localhost)
eureka.client.service-url.defaultZone=http://localhost:8181/eureka
If you run the application at this point you must see the 2nd application “MICRO-SERVICE-B” in the “Instances currently registered with Eureka” section. So, up to now, we have completed the registration part. in the next section, we will see how to find other service and call them from one service.
(STEP 5) finding and calling (other) service registered in the Naming server.
Now in this section, we are going to make a REST call of service-b from Service A.
- Add the following dependency in the pom.xml file of service a project
<dependency>
      <groupId>org.springframework.cloud</groupId>
      <artifactId>spring-cloud-starter-openfeign</artifactId>
</dependency>
2. Create a new interface name “ServiceBResourceProxy” as follows which will work as a proxy of “ServiceBResource”. So can directly call a REST API of Service B using this proxy:
package com.wordpress.babuwant2do.microservice.servicea.microservicea.web.proxy;

import org.springframework.cloud.openfeign.FeignClient;
import org.springframework.http.ResponseEntity;
import org.springframework.web.bind.annotation.PathVariable;
import org.springframework.web.bind.annotation.RequestMapping;

@FeignClient(name="micro-service-B")
@RequestMapping("/api/resource-b")
public interface ServiceBResourceProxy {
     @RequestMapping("/welcome/{name}")
     public ResponseEntity welcome(@PathVariable String name);
}
3. In the main class “MicroserviceAApplication” add annotation @EnableFeignClients to enable “Feign” in our application.
package com.wordpress.babuwant2do.microservice.servicea.microservicea;

import org.springframework.boot.SpringApplication;
import org.springframework.boot.autoconfigure.SpringBootApplication;
import org.springframework.cloud.client.discovery.EnableDiscoveryClient;
import org.springframework.cloud.openfeign.EnableFeignClients;

@SpringBootApplication
@EnableDiscoveryClient
@EnableFeignClients
public class MicroserviceAApplication {
     public static void main(String[] args) {
          SpringApplication.run(MicroserviceAApplication.class, args);
     }
}
4. Last but not least, we will call the REST-API of Service-B using the proxy class “ServiceBResourceProxy” we just created. To do this we need to modify “ServiceAResource” and take advantage of Spring Dependency Injection to have an instance of “ServiceBResourceProxy”. And finally, call the service and return the output from service-b with our original output of “ServiceAResource”:
package com.wordpress.babuwant2do.microservice.servicea.microservicea.web.rest;

import org.springframework.http.ResponseEntity;
import org.springframework.web.bind.annotation.PathVariable;
import org.springframework.web.bind.annotation.RequestMapping;
import org.springframework.web.bind.annotation.RestController;

import com.wordpress.babuwant2do.microservice.servicea.microservicea.web.proxy.ServiceBResourceProxy;

@RestController
@RequestMapping("/api/resource-a")
public class ServiceAResource {

     private final ServiceBResourceProxy serviceBResourceProxy;

     public ServiceAResource(ServiceBResourceProxy serviceBResourceProxy){
          this.serviceBResourceProxy = serviceBResourceProxy;
     }

     @RequestMapping("/hello/{name}")
     public ResponseEntity hello(@PathVariable String name){
          String welcomeMSg = this.serviceBResourceProxy.welcome(name);
          return ResponseEntity.ok("Hello "+ name+"\n"+welcomeMSg);
     }
}
5. Run the application as before using the command if not restarted successfully:
./mvnw spring-boot:run
6. As STEP-2 call get method using following URL: “localhost:8081/api/resource-a/hello/Ali”. As we promised in STEP-2 and implemented in STEP-4, to avoid port conflict here we use port 8081.
After calling this service you will receive a message like below instead of “Hello Ali”:
Hello Ali
we would like to invite you (Ali) from resource B.
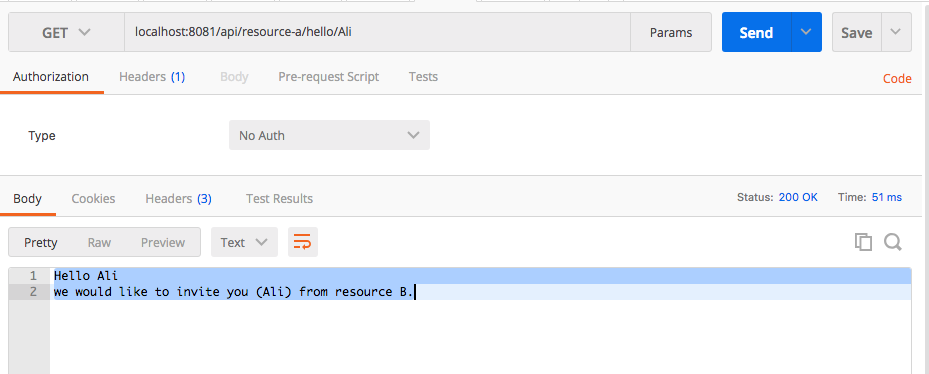
That means we call rest API of service-A but we received output from Service A and also Service B.
Conclusion:
So, finally, we have completed the very basic implementation of microservice using Eureka Naming service and “Feign”, consumed a service from another service and finally return the output to the final client endpoint.
This article is written based on my personal experience and for the beginner who wants to implement the microservice architecture step by step. Here I tried to explain the concept in an easier way, maybe very much informal way. If you think there are big conceptual mistakes, please feel free to correct me in the comments section, so that other readers can get the correct information.
Thanks for reading with patience!!
